Category: Backup & Recovery

  • Steps to restore the resource database

    Few days back, I had discussion with my team member regarding the resource database and we all are curious to see the resource database.

    As you all know resource database is hidden database and we can’t see it SQL Server. We follow below steps to restore the resource database and it worked. We can see the resource database.

    Resource database file location
    By default, these files are located in :\Program Files\Microsoft SQL Server\MSSQL.1\MSSQL\Data\. Each instance of SQL Server has one and only one associated mssqlsystemresource.mdf file, and instances do not share this file. In a cluster, the Resource database exists in the \Data folder on a shared disk.

    Follow below steps if you want to see the resource database.
    Step 1: Copy the resource database MDF/LDF file to different location and rename it. We have name both data and log file to resourcetest.

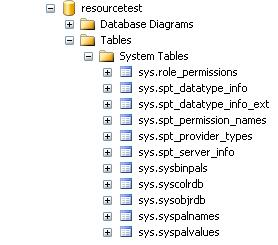
    Step 2: Execute the below command to attach the resource database file and you can see the resource database.

    USE [master]
    GO
    CREATE DATABASE [resourcetest] ON 
    ( FILENAME = N'J:\resourcetest.mdf' ),
    ( FILENAME = N'J:\resourcetest.ldf' )
     FOR ATTACH
    GO
    

    Resource Database Image

  • SQL Server 2008 R2 Unable to Start After Applying CU1

    Problem: Recently I got an issue on SQL Server 2008 R2 instance where cumulative update Package 1 applied. SQL Services are unable to start after the CU1.

    When I checked the error log, I found the below error messages in the log file.

    Error: 33009, Severity: 16, State: 2.
    The database owner SID recorded in the master database differs from the database owner SID recorded in database ‘msdb’. You should correct this situation by resetting the owner of database ‘msdb’ using the ALTER AUTHORIZATION statement.

    Error: 912, Severity: 21, State: 2.
    Script level upgrade for database ‘master’ failed because upgrade step ‘sqlagent100_msdb_upgrade.sql’ encountered error 33009, state 2, severity 16. This is a serious error condition which might interfere with regular operation and the database will be taken offline. If the error happened during upgrade of the ‘master’ database, it will prevent the entire SQL Server instance from starting. Examine the previous errorlog entries for errors, take the appropriate corrective actions and re-start the database so that the script upgrade steps run to completion.

    Error: 3417, Severity: 21, State: 3.
    Cannot recover the master database. SQL Server is unable to run. Restore master from a full backup, repair it, or rebuild it.

    Solution: As mentioned by Microsoft that CU1 has bug which is resolved in CU2 onwards version release. If you have already installed the CU1 perform the below steps to resolve the issue and if you haven’t applied CU1, install CU2.

    Step 1: Add the ;-T902 parameter to startup parameter list and start the SQL Server Service.

    Step 2: If the SQL Agent Service running, stop the agent service.

    Step 3: Connect to SQL Server through SSMS and change MSDB database owner and configure Agent XPs parameter.

    ALTER AUTHORIZATION ON DATABASE::MSDB TO SA
    

    Agent XPs value should be 1 for CU1, you can enable it by executing below query.

        EXEC sp_configure 'show advanced', 1;
        RECONFIGURE;
        EXEC sp_configure 'allow updates', 0;
        RECONFIGURE;
        EXEC sp_configure 'Agent XPs', 1;
        RECONFIGURE;
        GO
    

    Step 4: Remove the ;-T902 from the startup parameter list. Restart the SQL Server and Agent Service.

    Step 5: Remove the ;-T902 from the startup parameter list. Restart the SQL Server and Agent Service.

    Step 6:In SQL Server Management Studio, reconnect to the instance of SQL Server 2008 R2. In Object Explorer, expand Management, right-click Data Collection, and then click Enable Data Collection.

  • MySQL Replication Setup

    Mysql uses a Master-slave/Publisher-Subscriber model for Replication. MySQL replication is an asynchronous replication. In MySQL replication master keeps a log of all of the updates performed on the database. Then, one or more slaves connect to the Master(Publisher Server), read each log entry, and perform the indicated update on the slave (Subscriber) server databases. The master server is responsible for the track of log rotation and access control.

    Each slave server has to keep the track of current position within the server’s transaction log. As new transactions occur on the server, they get logged on the master server and downloaded by each slave. Once the transaction has been committed by each slave, the slaves update their position in the server’s transaction log and wait for the next transaction.

    In this article, I will show you the steps to configure the Master/Slave replication between two servers.

    Step 1: Create a user on Master server which Slave server can use to connect. I have created the user named “repl_user”.

    --Connect to MySQL Master server
    mysql -u root -proot
    --Execute the below code
    GRANT REPLICATION SLAVE ON *.* TO 'repl_user'@'%' IDENTIFIED BY 'password';
    FLUSH PRIVILEGES;
    

    Step 2: We have to change the MySQL configuration file usually in the /etc/mysql.cnf location. Here we will add the replication configuration parameters.

    log-bin – will be used to write a log on the desired location
    binlog-do-db – will be used to enabled the database for writing log. I have used Publisher_Database, you have to specify your database name.
    server-id – Specify the ID of the Master server

    log-bin = /home/mysql/logs/mysql-bin.log
    binlog-do-db=publisher_database
    server-id=1
    

    Step 3: Once you have added the above configuration parameters into the My.cnf, next step is restart the MySQL Master Instance.
    You can use below command to restart the MySQl service.

    /etc/init.d/mysqld restart
    service mysqld restart
    

    Step 4: We have to configure the /etc/my.cnf file on the slave server. Here we will add the below parameters in the configuration file.

    server-id – gives the Slave its unique ID
    master-host – tells the Slave the I.P address of the Master server for connection. You can get the IP address using IPConfig command.
    master-connect-retry – Here we will specify the connection retry interval.
    master-user – Specify the user which has permission access the Master server
    master-password – Specify the password of the replication user mentioned above
    replicate-do-db – Specify the subscriber database name
    relay-log – direct slave to use relay log

    server-id=2
    master-host=128.20.30.1
    master-connect-retry=60
    master-user=repl_user
    master-password=password
    replicate-do-db=subscriber_slave
    relay-log = /var/lib/mysql/slave-relay.log
    relay-log-index = /var/lib/mysql/slave-relay-log.index
    

    Step 5: Restart the slave MySQl instance

    /etc/init.d/mysqld restart
    service mysqld restart
    

    Step 6: If your Master MySQL instance is live instance, you have to do the backup/restore using MySQLDump utility.

    --Connect to MySQL Master server
    mysql -u root -proot
    
    --Stop the write operation
    FLUSH TABLES WITH READ LOCK;
    
    --Generate the dump of the database (backup)
    --gzip command will compress the file and create the zip file name backup.sql.gz
    mysqldump publisher_master -u root -p > /home/my_home_dir/backup.sql;
    gzip /home/my_home_dir/backup.sql;
    
    --execute below copy command on slave to copy the backup file
    scp root@128.20.30.1:/home/my_home_dir/database.sql.gz /home/my_home_dir/
    
    --Once copied, extract the file using gunzip
    gunzip /home/my_home_dir/backup.sql.gz
    
    --restore the databsae
    mysql -u root -p subscriber_slave  </home/my_home_dir/backup.sql


    Step 7: Execute the SHOW MASTER STATUS command on Master server. It will give you the bin log file name and position which we will use specify the slave.

    SHOW MASTER STATUS;


    +------------------+----------+--------------+------------------+
    | File | Position | Binlog_Do_DB | Binlog_Ignore_DB |
    +------------------+----------+--------------+------------------+
    | mysql-bin.000001 | 707 | exampledb | |
    +------------------+----------+--------------+------------------+

    Step 8: Execute the below commands on slave.

    --Connect to MySQL Slave server
    mysql -u root -proot
    --stop the slave
    slave stop;
    -- Execute the below command
    CHANGE MASTER TO MASTER_HOST='128.20.30.1', MASTER_USER='repl_user', MASTER_PASSWORD='password', MASTER_LOG_FILE='mysql-bin.000001', MASTER_LOG_POS=707;
    --Start the Slave
    slave start;
    

    Step 9: Login to Master MySQL instance and unlock the tables.

    --Connect to MySQL Master server
    mysql -u root -proot
    -- unlock the tables if you have executed lock tables command
    unlock tables;
    

    You are all set. Master to Slave replication has been started. Make sure while configuring the my.cnf file.
    1. Take the copy of my.cnf file before starting the replication configuration.
    2. Make sure skip-networking parameter is not enabled in the my.cnf file.

  • Restoring a SQLServer database that uses Change Data Capture

    Problem
    When restoring a database that uses Change Data Capture (CDC), restoring a backup works differently depending on where the database is restored. In this tip we take a look at different scenarios when restoring a database when CDC is enabled.

    Solution
    For solution, please check my new article on MSSQLTips.com

    http://mssqltips.com/tip.asp?tip=2421

  • How to kill all sessions that have open connection in a SQL Server Database?

    As SQL Server DBAs, many times we need to KILL all Open Sessions against the SQL Server Database to proceed with Maintenance Task, Restore and more…

    You can use below different techniques to KILL all open sessions against the database.

    Technique – I
    Here we will query the SysProcesses table to get the session running against the user database and prepare the dynamic SQL statement to KILL all the connection.

    DECLARE @DbName nvarchar(50)
    SET @DbName = N'Write a DB Name here'
    
    DECLARE @EXECSQL varchar(max)
    SET @EXECSQL = ''
    
    SELECT @EXECSQL = @EXECSQL + 'Kill ' + Convert(varchar, SPId) + ';'
    FROM MASTER..SysProcesses
    WHERE DBId = DB_ID(@DbName) AND SPId  @@SPId
    
    EXEC(@EXECSQL)
    

    Technique – II
    Take the database into Single User Mode and execute all the task needs to perform against the databse.

    ALTER DATABASE [Database Name] SET SINGLE_USER WITH ROLLBACK IMMEDIATE 

    Once you are finish with all the required task make the database accessible to everyone.

    ALTER DATABASE [Database Name] SET MULTI_USER

    Technique – III
    In case of restore the database by replacing existing database, you can take the database OFFLINE and restore it. Restore will bring the database online.

    ALTER DATABASE [Database Name] SET OFFLINE WITH ROLLBACK IMMEDIATE 
    ALTER DATABASE [Database Name] SET ONLINE
    

    Technique – IV
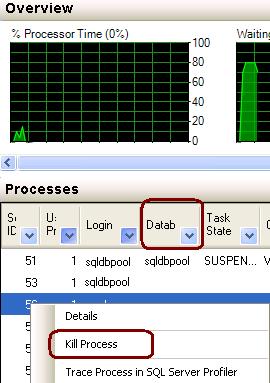
    Go to Activity Monitor, Select the desired database and right click on the database to KILL the process.