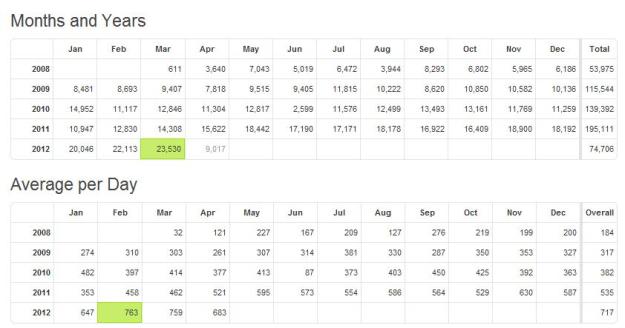
SQLDBPool Blog Stats
SQLDBPool Blog Stats
Dear Friends,
I want to share a good news with you all, I am again 3rd time awarded as MVP in SQL Server. Thanks for reading my site, I will keep posting the best article and always there to solve your queries.
Thanks,
Jugal Shah
You will see the 2012 in below award shortly -:)

Managing multiple SQL Servers has its challenges. One of the big challenges is having to collect data from each of the servers you manage and figure out which servers need attention. SQL Server has introduced a new feature called Central Management repository which can be used to manage multiple instances. One of the challenges to using CMS is that you have to register all the SQL Servers manually into CMS. The below article will guide you on how to register hundreds of servers in a second for SQL Server CMS.
Problem: Property IsLocked is not available for Login ‘[sa]’. This property may not exist for this object, or may not be retrievable due to insufficient access rights. (Microsoft.SqlServer.Smo)

Solution: You will get the above error, in case of one of the below issue.
SQL Server authentication mode is Windows Only
You can check the SQL Server authentication mode using below query.
SELECT
CASE
SERVERPROPERTY(‘IsIntegratedSecurityOnly’)
WHEN 1 THEN
‘Windows Authentication’
WHEN 0 THEN
‘Windows and SQL Server Authentication’
END
as [Authentication Mode]
If the authentication mode Windows, you have to change the authentication mode is Mix Mode. You can change the authentication mode by right click on Server Properties -> Security tab.
This requires SQL Server Service restart.

SA Account is locked/Disable
You can execute below query to check whether SA account is locked or not. If the account is locked it will return 1 and 0 for un-locked.
SELECT
LOGINPROPERTY(‘sa’,
‘IsLocked’)
You can investigate whether SA account is locked by bad Password using below query. It will return the count of consecutive failed login attempts
SELECT
LOGINPROPERTY(‘sa’,
‘BadPasswordCount’);
GO
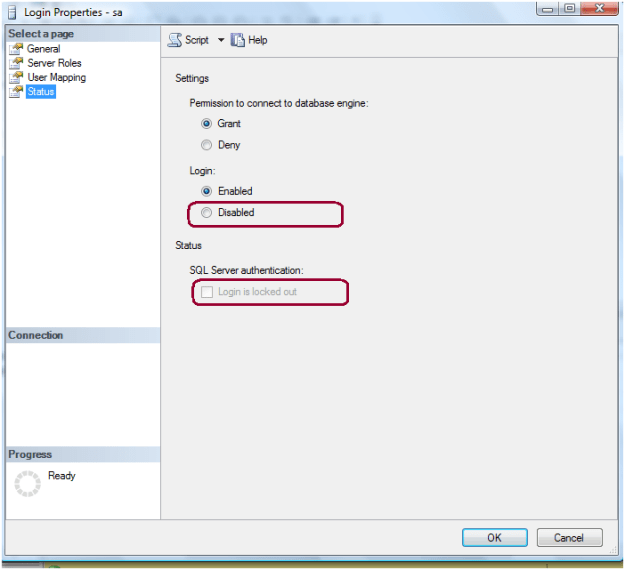
Right click on SA account and check the SA account properties, check the below properties of the SA login whether it is disabled or locked.
Execute the below script to unlock and enable the SA account
ALTER
LOGIN [sa] WITH
PASSWORD=N’Password’,
DEFAULT_DATABASE=[master],
DEFAULT_LANGUAGE=[us_english],
CHECK_EXPIRATION=OFF,
CHECK_POLICY=OFF
GO
ALTER
LOGIN [sa] ENABLE
GO
Step 1: Launch SQL Server Management Studio and In the Object Explorer expand the Management folder.
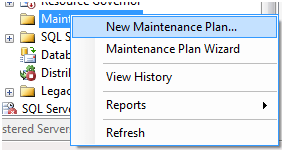
Step 2: Right click on the Maintenance Plans folder and select New Maintenance Plan.
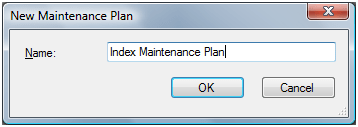
Step 3: Give the meaning full name to maintenance plan.
Step 4: From the Toolbox drag and drop a Check Database Integrity Task, Rebuild Index Task, Update Statistics Task and place them vertically in the same order.
Step 5: Connect the tasks together by dragging the arrow from one box to the other so they are connected as: Check Database Integrity Task – Rebuild Index Task – Update Statistics Task.
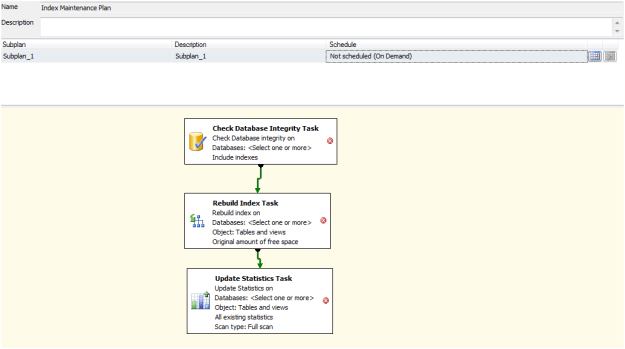
Step 6 Right click on the each tasks and select the databases in maintenance plan.
Step 7 Schedule a maintenance plan to run in off business hours.
